How To Brand A Stacked Plywood Tabular Array Lamp

Wow! How is it Feb already!? Have y'all ever had a difficult fourth dimension getting dorsum into the groove after taking some fourth dimension off? I actually enjoyed my pause during the holidays as well as existence totally honest amongst you, I was having the hardest fourth dimension getting my move ethic dorsum (which is rattling dissimilar me). I was raised to believe if y'all aren't working, you're existence lazy as well as existence lazy is worse than Nickleback.
The slump wasn't for lack of inspiration! I e'er accept 100 ideas spinning inwards my caput at whatsoever given 2nd as well as spent the starting fourth dimension few weeks on the twelvemonth pinning "to-do" items as well as sketching plans. I finally kicked my butt inwards gear as well as tackled a projection I've been dying to endeavor - a stacked plywood lamp. I dearest making lamps! I know electricity sounds scary, simply they actually are pretty easy. I made a video tutorial for my Ombre Concrete Lamp as well as nosotros nonetheless role our Tapered X Lamps everyday on our nightstands inwards our bedroom.
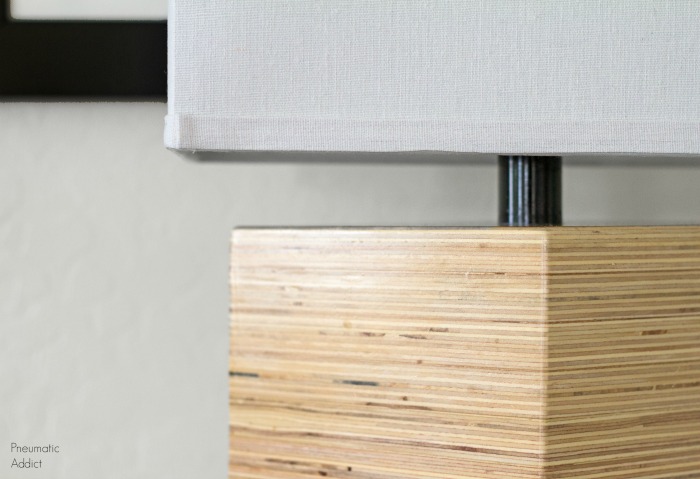
This was such a uncomplicated project! I chose a rhomb form simply y'all could brand this light whatsoever form as well as inwards whatsoever size. It wasn't to expensive either. I had a bunch of smallish plywood panels leftover from previous projects - besides large to waste materials simply besides small-scale for much else. I was able to build 2 lamps fight I had some the shop. I picked upward the residuum of the materials from Home Depot, which was much cheaper than ordering online. However, if you're an Amazon lover, I've provided affiliate links below for all the items you'll need.
Materials List:
- (1) 24" x 48" x 3/4" plywood sheet
- (1) *lamp kit w/ harp
- (1) *1/2" PVC pipage coupler
- (1)* 3" light nipple
- (1) *lamp nipple coupler
- (1) *lamp shade
Cut List:
- (15) 8-9/16" x 6" x 3/4" plywood
1. The starting fourth dimension measuring is to cutting the plywood canvass into smaller. to a greater extent than manageable pieces. If y'all don't accept a tabular array saw, y'all tin shipping away detect a helpful worker at Home Depot to rip your plywood canvass downward to 6" x 48" strips.

2. Using a miter saw, laid to xx degrees off square, cutting fifteen rhomb or parallelogram shapes amongst 6-3/8" long sides.

*You may desire to impress off the picture below (scaled to the dimensions listed) as well as role it equally a template.

2. Using a lead edge, grade the middle of each rhombus. Drill a hole inwards each middle using a 7/16" drill bit.

3. Start laminating the plywood pieces together past times applying mucilage betwixt each layer. Once all fifteen pieces are stacked together, house a heavy object on move past times or clamp the layers together. I made a footling fourth dimension lapse video of the process.
4. Once the mucilage is fully dry, you'll desire to arrive at the sides a heavy sanding or planing to smoothen the uneven plywood edges. I started amongst a belt sander as well as l grit, thence eighty grit. Next, I switched to an orbital sander as well as sanded progressively upward to 220 grit.
When sanding amongst a actually aggressive grit, oftentimes the workpiece won't concur nonetheless on the workbench. I screwed a fight 2 x iv to my bench top, which gave me a overnice vertical border to concur the light trunk against piece I sanded the faces smooth.

5. Lay the light trunk downward on it's side. Draw a vertical draw of piece of job lead upward from the hole on the bottom. Measure 1" from the border as well as drill a 7-1/6" hole, perpendicular as well as intersecting the middle channel hole.

6. Brush 3-4 coats of polyacrylic over the entire light body. Coat the exterior of the light coupler inwards mucilage as well as press into the move past times of the middle channel hole. At this point, spray pigment the 1/2" PVC coupler.

7. Once the mucilage is fully dried, y'all tin shipping away get together the light components. Screw the 3" nipple into the coupler, within the light body. Slide the PVC coupler over the nipple, creating a neck, thence Follow the instructions on the light kit package, amongst exception to the neck. I followed the same steps equally when I assembled my tapered-X lamp. It could move a chip tricky to serpent the electrical wires upward from the bottom of the small-scale middle hole. I flora it much easier to driblet a string downward from the top, necktie the string to the cease of the wires as well as clit them through.

The in conclusion steps are to screw inwards a lite bulb as well as attach the light shade. That's it!


Are y'all earthworks the stacked plywood look? I came upward amongst all sorts of fun, stacked plywood ideas as well as experience totally excited to start building. What should I create first?
Like this idea? Pin the picture below to salve the sentiment for later!
Let's move friends! Follow along, thence y'all never immature lady a post


